Amit Joshi
- Data Engineering
- airflow installation
- DAG
- Airflow LocalExecutor
- Airflow Workflow
- Data Engineering
- Airflow Python
- Airflow
- Data Scraping
Airflow tutorial 2: Set up airflow environments locally
11 September: Amit Joshi
In his first tutorial wrote about what is Airflow and how it works and his benefits to set data pipline. In the second part of the tutorial, I will gives a complete guide for a basic Airflow installation on local machine. To learn more, read the tutorial below.
Recap
In the first post of the series, we learned a bit about Apache Airflow. How it not only can help us build Data Engineering & Data pipelines but also other types of relevant workflows within advanced analytics, such as MLOps workloads. Now let's set up local environment to run the Airflow. Our work will revolve around the following:
- Apache Airflow Installation
- Apache Airflow DB Configuration
- Testing
The installation of Airflow is painless if you are following the instructions below. Airflow uses constraint files to enable reproducible installation, so using pip and constraint files is recommended.
Only pip installation is currently officially supported.
1. Apache Airflow Installation
We will install Airflow and its dependencies using pip:
# airflow needs a home, ~/airflow is the default,
# but you can lay foundation somewhere else if you prefer
# (optional)
export AIRFLOW_HOME=~/airflow

AIRFLOW_VERSION=2.1.3
PYTHON_VERSION="$(python --version | cut -d " " -f 2 | cut -d "." -f 1-2)"

# For example: 3.6
CONSTRAINT_URL="https://raw.githubusercontent.com/apache/airflow/constraints-${AIRFLOW_VERSION}/constraints-${PYTHON_VERSION}.txt"

# For example: https://raw.githubusercontent.com/apache/airflow/constraints-2.1.3/constraints-3.6.txt
pip install "apache-airflow==${AIRFLOW_VERSION}" --constraint "${CONSTRAINT_URL}"
2. Apache Airflow DB Configuration
Now we need to initialize our database:
# To initialize the database
airflow db init

airflow users create \
    --username admin \
    --firstname Peter \
    --lastname Parker \
    --role Admin \
    --email spiderman@superhero.org
3. Testing
It is time to check if Airflow is properly working. To do that, we spin up the Scheduler and the Webserver:
To start the web server execute the below commend, default port is 8080
airflow webserver --port 8080
To start the scheduler open a new terminal or else run webserver with ``-D`` option to run it as a daemon and execute the below command:
airflow scheduler
visit localhost:8080 in the browser and use the admin account you just created to login.
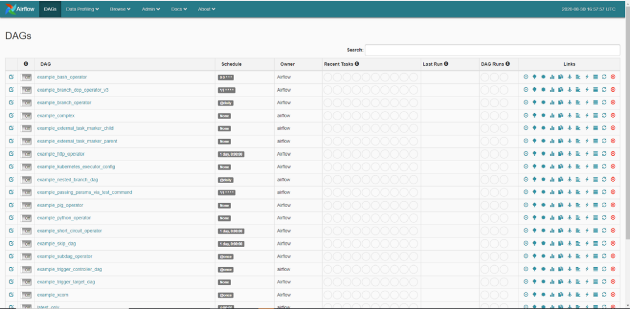
Once you fire up your browser and point to your machine’s IP, you should see a fresh Airflow installation:
That’s it.
Now you have a basic idea of Airflow installation, which allows you to run DAGs containing parallel tasks and/or run multiple DAGs at the same time.
In my next blog we will run Airflow using Docker. But for now, we will leave these steps for a future article.
Airflow tutorial 2: Set up airflow environments locally
11 September: Amit Joshi
In his first tutorial wrote about what is Airflow and how it works and his benefits to set data pipline. In the second part of the tutorial, I will gives a complete guide for a basic Airflow installation on local machine. To learn more, read the tutorial below.
Recap
In the first post of the series, we learned a bit about Apache Airflow. How it not only can help us build Data Engineering & Data pipelines but also other types of relevant workflows within advanced analytics, such as MLOps workloads. Now let's set up local environment to run the Airflow. Our work will revolve around the following:
- Apache Airflow Installation
- Apache Airflow DB Configuration
- Testing
The installation of Airflow is painless if you are following the instructions below. Airflow uses constraint files to enable reproducible installation, so using pip and constraint files is recommended.
Only pip installation is currently officially supported.
1. Apache Airflow Installation
We will install Airflow and its dependencies using pip:
# airflow needs a home, ~/airflow is the default,
# but you can lay foundation somewhere else if you prefer
# (optional)
export AIRFLOW_HOME=~/airflow

AIRFLOW_VERSION=2.1.3
PYTHON_VERSION="$(python --version | cut -d " " -f 2 | cut -d "." -f 1-2)"

# For example: 3.6
CONSTRAINT_URL="https://raw.githubusercontent.com/apache/airflow/constraints-${AIRFLOW_VERSION}/constraints-${PYTHON_VERSION}.txt"

# For example: https://raw.githubusercontent.com/apache/airflow/constraints-2.1.3/constraints-3.6.txt
pip install "apache-airflow==${AIRFLOW_VERSION}" --constraint "${CONSTRAINT_URL}"
2. Apache Airflow DB Configuration
Now we need to initialize our database:
# To initialize the database
airflow db init

airflow users create \
    --username admin \
    --firstname Peter \
    --lastname Parker \
    --role Admin \
    --email spiderman@superhero.org
3. Testing
It is time to check if Airflow is properly working. To do that, we spin up the Scheduler and the Webserver:
To start the web server execute the below commend, default port is 8080
airflow webserver --port 8080
To start the scheduler open a new terminal or else run webserver with ``-D`` option to run it as a daemon and execute the below command:
airflow scheduler
visit localhost:8080 in the browser and use the admin account you just created to login.
Once you fire up your browser and point to your machine’s IP, you should see a fresh Airflow installation:
That’s it.
Now you have a basic idea of Airflow installation, which allows you to run DAGs containing parallel tasks and/or run multiple DAGs at the same time.
In my next blog we will run Airflow using Docker. But for now, we will leave these steps for a future article.